![]()
Projected Ghosts
![]()
The projected ghosts is an effect similar to what is seen in the Haunted Mansion ride. This effect is very effective when projecting on scrim which you can use wedding veil to make up a projection screen. I’ve had this effect for 10 years and have perfected into a very realistic effect.
Construction:
1. Slide Projector
2. Mirror Ball (8 inch diameter works good)
3. Timing motor (1 to 2 RPM works the best I found)
4. Slide of a ghost to put into the projector
5. 3 ft of 1 x 6 wood to mount the mirror ball sideways
6. 16 inch long Wood dowel (should be the same diameter as the shaft of the motor)
7. One Ball Bearing (Needs to fit on to the dowel)
In order to get the ghost to look like they are rising from the grave we need to have the mirror ball rotate on a horizontal axes. A mirror ball is meant to hang from a hook but in order to have the ball rotate sideways we need to use a piece of dowel as the new axis for the ball to rotate around. The diameter of your dowel should be the same diameter of the shaft on the motor.
Taking a piece of dowel about 16 inches long you need to stick it through the center of the ball where you normal hang the ball from. Make sure it goes through the whole mirror ball and comes out the other end in the center of the ball. This will make sure that your ball does not wobble when it rotates.
Now we need to construct a bracket to hold the mirror ball as it rotates .The size of your bracket will depend on the size of your timing motor you use. But to give you an example lets say its the same size I used. The bracket will consist of three pieces of the 1 x 6 wood two sides and a bottom piece. Cut two pieces of wood that are 8 inches long and cut one piece that is 10 inches long. Now take the two 8 inch pieces and nail them to each end of the 10 inch piece to from a U shape. See picture below for guidance.
To attach the mirror ball to the bracket we need to mark off where the mirror ball is going to sit level in the bracket. This can be down with a tape measure or can just be eye- balled. You want the motor to be in the same line as the axle of the mirror ball including the ball bearing as well. You will need to drill a hole for the ball bearing to sit in on one end of the bracket and the other end the motor will be attached.
Attaching the mirror ball to the gear motor can be tricky. What I found works best is to get a piece of plastic tube which you can get different sizes at you local hardware store. The tube should fit snugly around the shaft of the motor and the shaft on the mirror ball. This looks like coupling the two axles together by slipping a short piece of tubing over them.
Before attaching the motor to the bracket you need to slip in the mirror ball otherwise you will not fit it in if you attached the motor already. You can now attach the ball bearing to the mirror ball. Once you slip in the mirror ball now slip in the motor and you need to attach it to the wood making sure it is in line with the mirror ball axle. Once you attach the motor to the bracket attach the two axles together with the piece of tubing.
In the picture you will see it is attached to a gear. The motor I got came out of an old humidifier and the gear was attached already. I just drilled a hole the same size as the axle of the mirror ball in the center of the gear and used some glue. If you come up with a better way of attaching the mirror ball and motor together go ahead and do it that way.
Now for making up the slide of the ghost to project on to the mirror ball. I used a piece of plastic used for making overhead slides and drew one on the plastic using black paint. If you don't want to make a slide you can put a small gobo which is a pattern cut out of a piece of thin metal and is used in stage lighting can be used. I just recently started doing this and the cost of a gobo is around 15 dollars and can be order online or you can pick one up if you live near a theatrical lighting store. You can get a stock pattern of a ghost very easily from a company who makes gobos. The gobo I use is from Apollo Design Part # ME-3069. You need to purchase an E size gobo for it to fit into the slide projector. The picture to the right shows the gobo taped to a piece of black paper to slide into the projector.
When seeing this effect you will notice that some of the ghost projected will be overlapping each other. If you do not want this to happen you can cover up some of the mirrors randomly by gluing some black paper to them as I did.
Also you must put the projector very close to the mirror ball. If you do not then the image will be cut off because the mirrors are so small. Don't be afraid to do some experimenting to get the right effect you want.
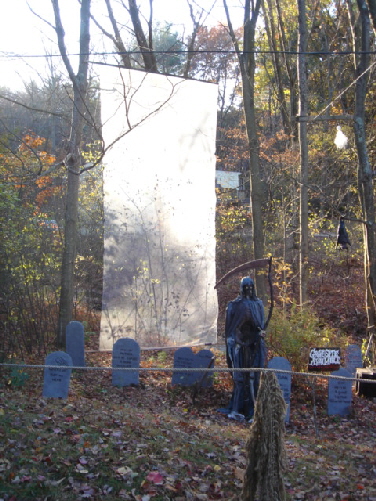
The picture to the side shows what the scrim would look like. This scrim is made of wedding veil and it is comprised of two pieces that are 6 feet wide that are stapled together to make a 12 foot wide screen that is 18 feet long. Down the two sides there is a piece of rope that helps keep the scrim from moving in the slow wind. The rope also takes the tension of the scrim to hold the weight of the bottom wood rail. This scrim will not work in high winds.
 Picture on right shows the scrim setup behind the graveyard. At night the scrim is invisible and only the ghosts projecting off it are seen.
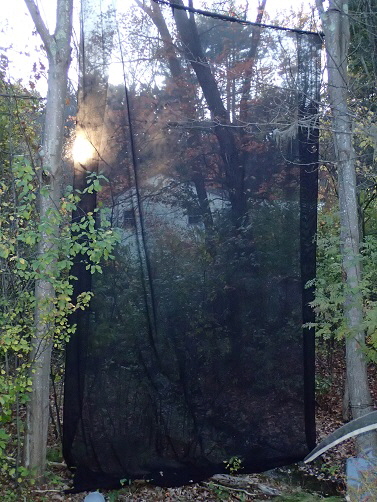
 Picture on left shows a black scrim which is new for the 2016 season. Using a black scrim is more invisible at night but the trade off is that it doesn't reflect as much light as a white scrim does. I’m still using the same projector but the ghost are a little harder to see. The scrim used is a professional theater version made of cloth.
The Haunted Driveway
Dedicated to Home Haunters