![]()
Rocking Tombstone
![]()
This project involves a tombstone that rocks forwards and backwards using a gear motor. The plans below are for building the moving base only. You supply the tombstone of your choice being that it is no more than 13” wide. Please read through all instructions before purchasing any parts.
Construction:
1) 3/8” thick piece of plywood used for base. (I used a piece of leftover plywood)
2) 3/8” thick 1” wide strips. (I used some plywood ripped into short lengths)
3) 3/8” thick piece of plywood used to hold the tombstone base. (again leftover piece)
4) 1/8” thick piece of plywood used for walls and top. (I used pieces of leftover plywood)
Following parts needed for the rocking assembly
1) Two 3/16” bolts 2” long. (axle for the rocking motion)
2) 3/16” bolt 1” long.
3) Six 3/16” washers.
4) Two 3/16” lock washers.
5) 3/8” washer.
6) 3/16” lock nut.
7) 1.5” diameter washer.
8) 1/4” bolt 1” long.
9) 1/4” nut.
10) 1/4” locking nut.
11) 1” L bracket.
12) Small 1” L bracket.
13) 2-5/8” long aluminum strap 1/2” wide.
14) Two 3/8” threaded rods 9” long.
15) Four 3/8” nuts.
16) Small 30RPM 12V DC gear motor. AliExpress link for motor
17) Arbor. McMaster Carr part# 43555A21 (attaches to the motor shaft...this is for a 1/4’ shaft)
18) 12V DC power supply to run gear motor.
19) Power cord. Mcmaster Carr part# 7248K22 (if you have a power cord already go ahead and use it)
The first picture on the right shows an overview of the base with mechanicals for the rocking action.

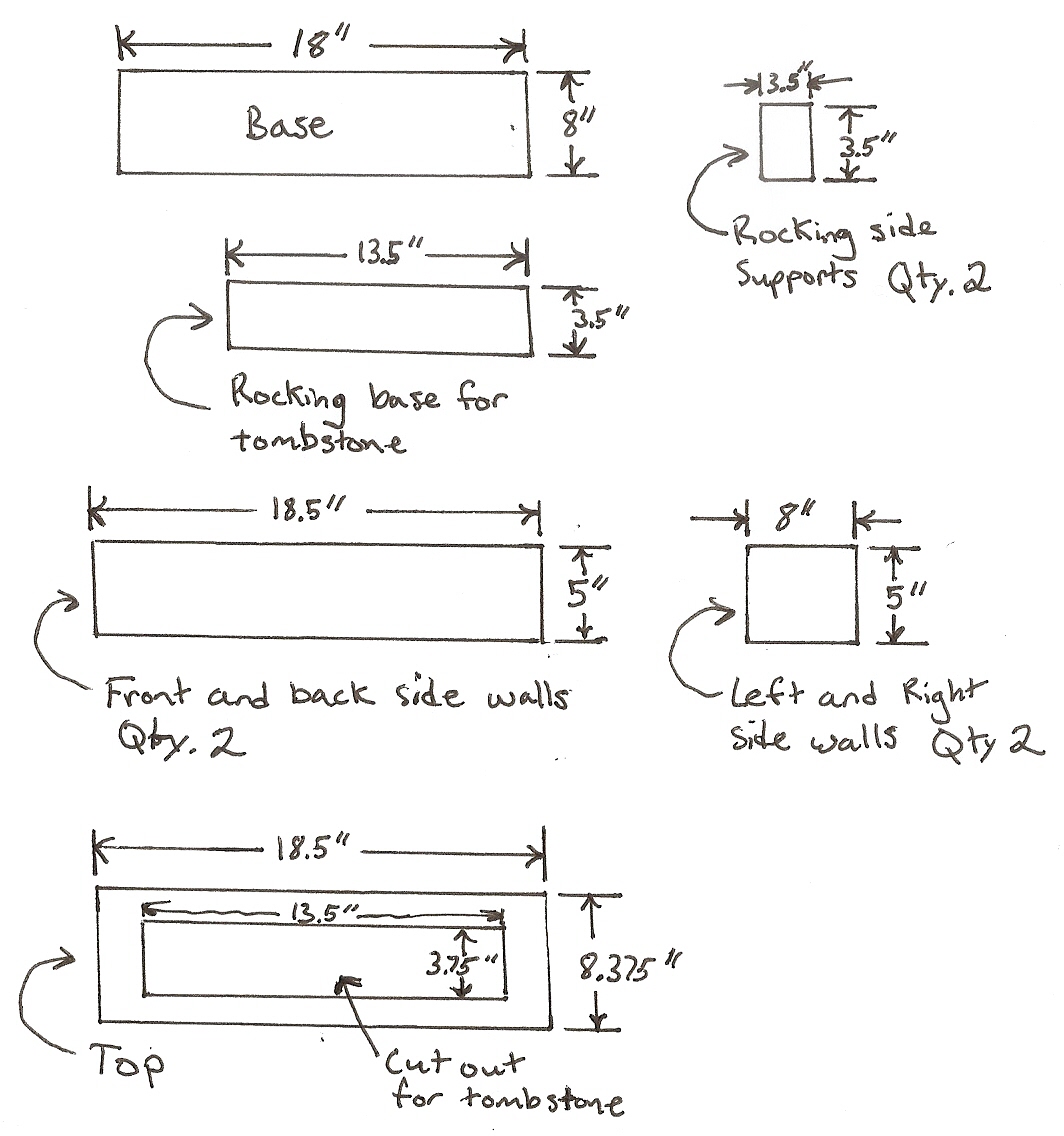
Picture on right shows dimensions for all the wood parts except for the wood strips that are used for the rocking side supports, the corners, walls and the base of the walls. These will be used in coming steps.
The above two pictures shows the rocking base where the tombstone sits on. The Left picture shows the rocking base held in position by two side supports with strips of wood for support and 3/16” holes drilled in each of them for axles at the top. The axle uses two 3/16” bolts 2” long on each side with a nut to tighten to the side supports followed by two washers as spacers as seen in the right picture.
The holes drilled into the rocking base where the tombstone sits has 3/16 holes as well that are 2” deep. Attaching the wood strips to the base I have used a nail gun and will use it to attached the rest of the wood strips. The two threaded rods are attached at this point spaced out 7” apart and two 3/8” nuts on each rod tighten it to the rocking base. The tombstone will slide over these two rods by drilling to deep holes in the bottom of the tombstone.
The three pictures above show the motor with mounting and the arbor that attaches to the motor shaft. The motor was bought from AliExpress (link above for motor) and its a 12V DC 30RPM motor. I’ve use a corner bracket bought from Home Depot pictured in the center to mount the motor using existing mounting holes on the motor gear box. The arbor is made up of the 1.5” diameter washer with a 3/16” hole drilled close to the edge. The 3/16” bolt 1” long with three nuts and two lock washers to take up slack on the bolt for the bar to clear as the arbor rotates. At this point I have attached the 5V power supply with a foot of wire.
The bar on the right shows a 3/16” hole and 1/4” hole drilled on each end.
Both pictures above show the motor assembly with linkage attached. The linkage mount at top edge uses the 1” L bracket with 1/4” hole drilled to accept the 1/4” bolt. The bolt has a nut that secures the bolt to the bracket with a washer on either side of the bar and a lock nut that has a loose fit to allow the bar to move freely. A 3/16” lock nut for the arbor also has a loose fit for free movement of the bar. The arbor shaft has been cut down to a 1/2” length if you notice the arbor yourself looking longer than in the picture in order for the bar to freely rotate.
Both pictures above show the strips of wood laid around the edge to add thickness to the sides and give a larger area for the nails to hold the side walls in place. There are also short pieces that reinforce the corners as seen in the right picture with side walls in place. Below video shows the rocking action.
Pictures above show all four side walls up and also the power cable is attached and threaded through a hole drilled in the back side wall.
Picture on left shows the top piece with a cut out for the tombstone to fit through. The top is fastened down with four screws and not nails so I can gain access to the motor if need be.
Picture on left shows the completed rocking tombstone with a 3 foot tall tombstone.
The Haunted Driveway
Dedicated to Home Haunters